Tangible Programming

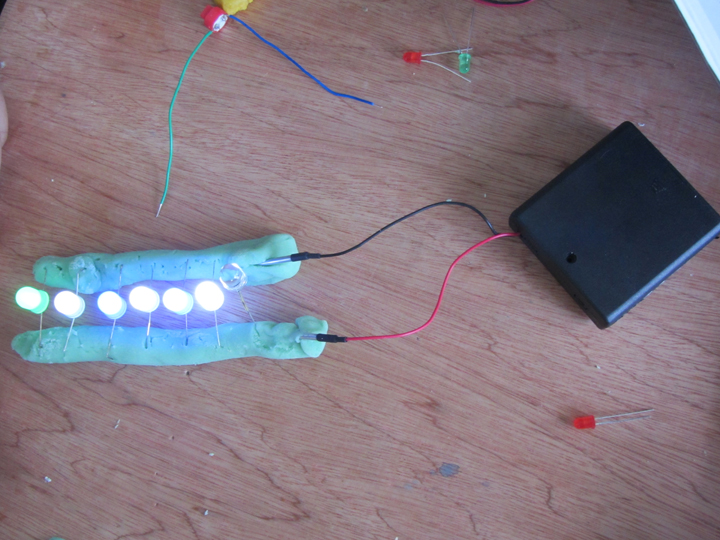
A potential future area of research for Sensory Objects is how to make programming easier for people with limited ability to use a computer. Previous iterations of the project have used Arduino microcontrollers, which are programmed in a derivative of C. Though it’s relatively simple for those with programming experience, it does require some knowledge of programming concepts like loops, decisions, and logic. Users also need to have reasonable vision, typing ability, and sufficient dexterity to connect cables and wires to the Arduino boards.

To allow a wider audience to program, we would like to circumvent the computer usage part by providing a ‘tangible interface’ made up of physical objects which users can manipulate to create computer-readable instructions.

Many projects have examined this before us. Here are a selection of them.

http://blogs.reading.ac.uk/digitallyready/author/lvs02ka/

Digitally Ready – a project run by Nic and Kate to get Art students using Arduinos.

Mostly focused on LEDs, buttons and pressure sensors. Arduino control appears to have been minimal, main use of them was for powering Squishy Circuits.


http://hci.cs.tufts.edu/tern/

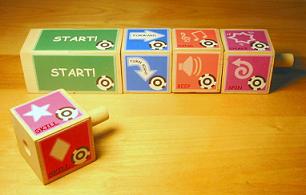
Tern is a method of programming Turtles by the use of wooden blocks which have computer-vision readable images printed on them. The blocks represent a single instruction, like “go forwards”, “turn”, or “beep”.

The blocks are not at all electronic, and once a program is ‘written’ it has to be read and interpreted by a computer with a webcam.

No branching, logic, or loops are possible- all programs are straight lines of instructions.


http://littlebits.cc/

littleBits are small PCBs with magnetic connectors at either end. They are color-coded by category, and a single ‘bit’ is either an input (sensor) or output (effector). The bits signal to each other and provide power through their connectors.

Programming concepts with the default set of bits are limited to IF (IF this switch is pressed, THEN turn on an LED) and AND (IF this switch AND this light sensor are activated, THEN turn on an LED). OR and NOT bits (‘inverter’) are available, as are dedicated AND bits. No loops are possible, but limited timing functions are present.


http://xenia.media.mit.edu/~mcnerney/mcnerney-sm-thesis.pdf

Image

Tangible Programming Bricks are Lego bricks with embedded microcontrollers. Each brick performs a specified function. The bricks are stacked on top of each other to create a program. They communicate through electrical contacts on their top and bottom sides.

Individual bricks’ functions can be modified by inserting ‘smart cards’ into a socket on one end, altering the time a brick is active for usually.

Some bricks contain sensors or effectors such as IR communications, allowing multiple stacks to interact.

Loops and conditional statements are possible and encouraged, as well as logic.

Paper contains a detailed critique of the concept in the Discussion section.


http://itee.uq.edu.au/~peta/WyethInteract.pdf Image

Electronic Blocks are Duplo bricks with simple embedded electronics, much like LittleBits. Blocks are groups into categories by colour, and images are printed on the sides of the blocks to indicate their functions. Programs are created by stacking bricks on top of each other. Signals flow from the top of the stack to the bottom.

Sensor blocks, effector blocks, and logic blocks are present. Conditional statements and AND, OR, etc are possible, but no looping or branching.


http://www.reactable.com/

http://en.wikipedia.org/wiki/Reactable

http://www.youtube.com/watch?v=0h-RhyopUmc

Reactable is a sound synthesis device which consists of a translucent table on which blocks are placed. A camera reads the underside of the blocks to determine their function and position. It also tracks fingertips pressed against the surface.

A video projector provides extra UI elements on the table. These can be used as indicators or controls using the aforementioned fingertip sensing.

Once placed on the table, the blocks can be used to create or adjust various qualities of sound. Moving blocks close to each other causes them to link up and affect each other. Rotating blocks usually affects some aspect of their function.


http://www.nada.kth.se/kurser/kth/2D1624/PDF/Litteratur/p299-montemayor.pdf

 ImageStoryRooms are specialised rooms containing a variety of toy objects. A user enters the room with a ‘magic wand’ object, which can be used to define interactions between other objects. All objects present are wirelessly controlled by a researcher behind a one-way mirror via a computer. In response to the user performing an action intended to create a relationship between two objects, the researcher would attempt to provide a suitable reaction from the objects.

Programming in this way is done by performing the actions in ‘programming mode’ with the wand, the researcher observes and notes the required interaction, then recreates it whenever the same action is performed out of ‘programming mode’.


http://vimeo.com/56011933

http://dl.acm.org/citation.cfm?id=2479578 Image

 Cuboino is a set of wooden cubes with channels cut in them. Most cubes are passive and direct the marble through only the use of the channels. They can be stacked and arranged to create a ‘marble run’. Active cubes can be snapped together to create devices. Some cubes have sensors for light, sound, button presses, or marbles passing over them. Others emit light, drop marbles, redirect marbles, etc. Some cubes simply provide power or transmit signals.

Simple, stylised designs are used to indicate the function of each cube. All of them are made from plywood and are only really differentiable by the components visible on their surfaces.


http://dl.acm.org/citation.cfm?id=1226999

GameBlocks are large (~300mm) cubes with bright orange symbols on their tops. They are used by placing them onto trays which sense an arrangement of magnets in each cube’s underside. A central microcontroller reads each tray sequentially and performs the action associated with the block.

No sensors are present- they are simply a method of instructing a sequence of movements by a robot.


http://alfredosandes.tumblr.com/post/49060337074/dr-wagon-a-revolutionary-tangible-programmingImage


Dr. Wagon is a method of programming a turtle (a wooden ‘wagon’ with a face on the front in this case), by means of a selection of snap-together wooden blocks. A ‘Start’ block is used to power the blocks, and communicate with the robot. Blocks are connected in a line under the Start block by four copper contacts, and held in place with magnets. Each block contains a PIC on a breadboard which communicates with the Arduino in the start block. When the start button is pressed, the Arduino polls the blocks under it sequentially. Each block sends the Arduino a single line of the program, which the Arduino then collates and transmits to the robot via radio. The robot’s on-board Arduino then compiles and runs the program.

Block functions are indicated by laser-cut writing on the top surface of the blocks. Program flow is also indicated by laser-cut arrows on the edges of the blocks. This does indent the wood slightly, making it readable by touch.

Loops and conditional statements are possible, but logic is not.


http://www.topobo.com/

http://www.youtube.com/watch?v=z4OcryzHiB0

Topobo is a selection of plastic parts which connect via magnets, span connectors, and screws. Most parts are ‘passive’ in that they contain no motors or electronics. Some parts are ‘active’ and can move parts attached to them by means of motors.

Active parts can be placed into a ‘learning’ mode during which they record any movements they are subjected to. Once set back to playback mode, they repeat this movement in a loop. This allows users to program a model of their own creation by manipulating it into performing the desired action.


Posted in Uncategorized | Tagged , , | 2 Comments

Redesign #1

If it was on wireframe rendering you could see the rotary switch and microswitch, but it's not, so you can't.

Now with clicky dome thing, microphone hole, and string hole!

Redesign #1

Borrowed the LittleBits set from Nic, modelled the connectors. Trying to design a new body for the 3D printer, based on discussions today with Kassie and Kate.

Collectionmodulemockup

Collectionmodulemockup

KassieCollectionModule1.

Kassie test Collection Module

KassieCollectionModule2jp

Kassie test record button on Collection Module

Kassie tests pullcord idea for hearing a recording CollectionModule

Kassie tests pullcord idea for hearing a recording Collection Module

Posted in Uncategorized | Leave a comment

Simple sound recording chip – LCTech

Another device has been tested for the project, LCTech’s ISD1820-powered ‘voice module’.

LCTech Voice Module

This is a fairly small board centred around a single-chip recording and playback solution. From a little googling, it was found that the chips can be purchased for about £0.56 a piece.

The downside of them is that by default, they can only record up to 10 seconds of audio, and the quality is awful. They record at 6.4KHz, which is far below the Nyquist frequency for human-audible sound of about 44Khz (see CD-quality audio for examples).

This can be adjusted up to 20 seconds of audio (at an even lower sampling rate of 3.2KHz), or down to 8 seconds of audio, at 8Khz.

The quality is not helped by the microphone being equally cheap and soldered directly to the board – it’s very hard to get it close enough to the sounds you want to capture.

Despite this, the interface to the chips is very well-suited to the project- they run off 3V sources, like 2 AA batteries, or most LiPo cells, and all of their functions are controlled by simple IO pins. There’s no user interface, and all responses are immediate.

This lends itself well to having a simple ‘hold to record’ function, and ‘pull to playback’. The chip will even cut off playback halfway through if you press record, and write over the sound!

The other downside is that there’s no way of digitally copying the recorded sounds from the chip, as with the MP3 player, or any of the devices using SD cards. This means there’s no way of saving, editing, or otherwise altering the sounds via computer.

Although the chips can only record a single sound at a time, they’re so cheap and simple it may be worth creating a ‘master’ device which controls multiple chips, and adding some pre- and post-processing to the audio, like a preamp stage for the microphone, and an amplifier for the speaker to increase the volume and fidelity.

Redesigning the board the ISD1820 comes on could allow multiple devices to fit into one case.

Redesigning the board the ISD1820 comes on could allow multiple devices to fit into one case.

It also conveniently fits into the test case, even on its original board!

Prototype image #1

Craig developing collection module

Craig developing collection module

Posted in Hardware | Leave a comment

User Interface Ideas – Soundbox

As mentioned earlier, the idea is to make a simple and intuitive sound recording and playback device. This means no tiny LCD screens with fiddly menus to be navigated, just big controls whose function becomes obvious as soon as they’re manipulated.

We want, at a minimum, a device that can record and playback a single sound. Ideally, it should work with several.

The device should be easy to grip without accidentally activating its controls. The dictaphones used previously were good for this, as they have a large and easy to press record button.

A conveniently-sized sweet container, next to a omnidirectional microphone.

A conveniently-sized sweet container, next to a omnidirectional microphone.

It would be good if we had different actions to activate different functions of the device, as this should make it easier for users with limited muscle control to select the function they want – having tiny buttons next to each other is bad.

A secondary method of input was suggested as a ‘pullstring’, inspired by toys which pulling a string activates a noise. A string also naturally invites pulling, which would allow users to discover how to operate the device through playing with it.

As many senses as possible should be utilised in controlling and providing feedback from the device. As the most complex function is likely to be selecting which ‘save slot’ is to be used, the current main idea is to have a rotating section on the device, which ‘clicks’ as it is moved into place. Different textures and bright colours should also be used to indicate the selection for visually-impaired users.

Finally, as the ultimate aim of the device is to allow users to collect sounds and integrate them into circuits of their own design, some sort of connector capable of interfacing with other bits of electronics should be present on the device. We have done some investigation into ‘littleBits‘, which are small boards with snap-together magnetic connectors. The device should play whichever sound is selected when it receives a signal.

prototype1

A quick design in Solidworks- the right image shows the microphone holes and the ‘click’ mechanism indents.

Posted in Uncategorized | Leave a comment

Devices to be modified

Some of the devices under consideration.

Some of the devices under consideration.

We are looking for devices which could be easily modified into our prototype soundbox at the moment.

The device has to be capable of both recording and playing back a small selection of sounds. It has to be portable, and operate with as few controls as possible.

Previous work in this area used dictaphones, which are quite expensive, but provide very good sound quality. They don’t generally have a playback function, as they are intended to be connected to a computer for download and editing. This is a step which we would like to avoid with our device.

There are a multitude of cheap MP3 players on the market at the moment which are able to record and play back in a few formats, such as .WAV or .MP3. One of these has been disassembled for study:

2013-07-02 14.50.11

It runs (or ran, rather- the battery leads snapped off during testing) on a small lithium-polymer battery, and is controlled through a small LCD screen by five pushbuttons on the front. It has a 3.5mm jack for headphones, and a mini-USB socket which can be connected to a computer to modify the contents of its memory, and to recharge the battery.

It is small enough to be easily inserted into a handheld case, and is definitely capable of recording multiple short audio clips onto its 4GB of flash memory.
However, the user interface needs a fair bit of navigating and some unintuitive button presses. There’s also a long delay when switching from playback or record to the main menu. Even if we were to replace the buttons with control by an Arduino, the delay would probably cause issues during use.
The MP3 player, despite having a ‘record’ function, did not actually have a microphone. Soldering one onto the PCB solved this.
Sound quality is fairly poor, with a lot of noise and a continual beeping.

2013-07-04 15.05.02 2013-07-04 15.00.14
We have also considered making a video capture device, and have done some similar tests on this “Trevi VideoMemo Recorder”. It is very simple to operate, and can record up to three different videos. It can be switched from recording to playback quite quickly, and does not have a complex GUI.

There’s no way of extracting the data from its memory, as the device does not have a USB or other data socket. It also runs on AA batteries, or any other source of 3V DC. It’s also considerably larger than the MP3 player.
During testing, it was found that the VideoMemo has what looks like a slot for a mini-SD card silkscreened onto its PCB (circled in the image to the right), but there’s no socket attached by default- this could provide extra storage space or a way of extracting recorded sound and videos if one was attached.
Some other possible devices to be looked at include the circuits used in greeting cards, MP3 shields for Arduino microcontrollers, and stand-alone barebones MP3 player circuits.

Posted in Hardware | Leave a comment

Using Arduino in Workshops

We chose to use Arduino in the Sensory Objects project as it is a relatively easy to use microcontroller platform which is easily reconfigurable and flexible enough to allow experimentation. We had hoped that our co-researchers would be able to plug in sensors to the Arduino and get a little practical experience of what different sensors are capable of doing and how they differed. But in practice, the Arduinos are quite fiddly to use – even plugging in a few wires could be a major challenge (even for the care workers). For people who do not have a great deal of manual dexterity, the task of putting a tiny plug into a tiny socket is huge, and for some, not possible. We need a much more robust and straightforward method of connection, but as we discussed in the last meeting, there are lots of parameters to consider first.

To try and relate some of the difficulties challenges that we faced, here is a list of the things that emerged when we used Arduino in our sensory workshops for people with learning disabilities:

  • Jumper leads and sockets are too small.
  • Jumper leads tend to ‘jump’ out of the sockets. This lead to many difficulties in practice, and having to constantly check that the leads were plugged in.
  • It is easy to plug the leads into the wrong socket. In addition, the writing (legends) on the sockets is very small and difficult to judge which legend belongs to which socket.
  • There are too many sockets. People became confused with the large number of sockets on this general purpose microcontroller.
  • The sockets are not colour coded in any way, and despite adding colours to the wires to help determine which sockets they were supposed to go into, this was of limited use.
  • Sensors were difficult to understand for almost everyone using them, and it often not clear how two sensors differed apart form some visual differences. For instance, the light sensor and distance (ultrasonic) sensors are easy to confuse, as each could be used to trigger an action by moving an object closer (or over) the sensor.
  • Sensor leads have to go into specific sockets on the board, and these are not meaningful to those people using them. Often, plugs are put into the wrong sockets and it can be difficult to notice as the sockets are so small.

In addition to the microcontroller itself, we also had issues with audio. Capturing audio was straightforward enough, but the audio clips then had to be uploaded to a computer, the format changed for the wave shields (the audio devices we added to the Arduinos) and then software created (and uploaded to each microcontroller) to produce the sounds that were requested. Co-researchers could not select and play their own choice of sounds using the Arduino and waveshield – the production of the sounds had to go via the project team. This is time consuming and inflexible.

Hence, we will be exploring alternatives that will provide more robust methods of experimenting with sensors so that co-researchers can attain a greater autonomy with the technology we provide, and try things out for themselves. The first step, as we discussed in the last meeting is to create a ‘sound box’ add-on to the Little Bits experimentation kit. The sound box will be capable of recording a single sound, and playing it back, and simple enough to be used by anyone. But it will also be capable of being connected to existing Simple Bits kit allowing experimentation with sensors.

Posted in Uncategorized | Leave a comment

First Meeting! What do we want?

Thoughts on white board

Mind Map during first meeting

The image above documents the discussion of the Extra Sensory Objects research group. We noted the things we would like to change about working with Micro controllers with Co-Researchers during workshops. We considered how we could scale up the Micro Controller (Arduino) giving easier indication of where things needed to be plugged in.

How could we make the workshop process of collection in the museum, (for example of sounds), more simple and linked directly to how we trigger the sound with the micro controller?

During our Sensory Objects workshops at Speke Hall and in our Interactive Sculpture Workshops in the Art Dept at UoR we really enjoyed using Squishy Circuits to introduce the group to circuits. It was simple, tactile and there was something to enjoy no matter what your capabilties were. But moving on from this to using micro controllers such as Arduino was problematic as the Co-researchers needed so much support they lost control of the work. A similar problem was experienced with collecting sounds from museums to use with triggers in later workshops. We provided good quality recorders to capture sounds but the process of downloading the sounds to be used with micro controllers was complicated and had to be done on a computer so again the Co-researchers had to rely on others to achieve this part of the process. We wished we had simple way to collect sounds like these one press as units pictured below and then be able to connect them directly to the micro-controller.

speaking and recording units

speaking and recording units

We first discussed making a scaled up version of the micro controller we used in our Liverpool workshops Arduino but because the  arduino gives so many options to control so many thinngs it is very quite complex. One of the group, Andrea Alessandrini, mentioned Little Bits which is an open source library of electronic modules that snap together with magnets, we decided to explore Little Bits. Little Bits is made for children, it is colour coded and used magnets on units to join bits together so was very easy to use. We could control things like light, sound and motors. The Little Bits kit comes with a buzzer that we could control with various sensors. We wished there was a way to put our own sound content into Little Bits.

Trying little bits 2

Trying little bits

Kassie and Craig try littlebits

Kassie and Craig try littlebits

Trying little bits 5

Trying little bits 5

Faustina and Nic explore little bits

Faustina and Nic explore little bits

Posted in Uncategorized | Leave a comment